HubSpot's URL personalisation tokens are a game-changer, streamlining workflows and eliminating the need for complex lists and smart modules. But you can only use these in emails, so what if you could bring that same personalised experience to your website?
We did just that, developing a simple hack to replicate this functionality, and now we're sharing it with you. We use this technique to showcase a contact's most recent download on our smart landing page so they always have access to the content they're interested in.
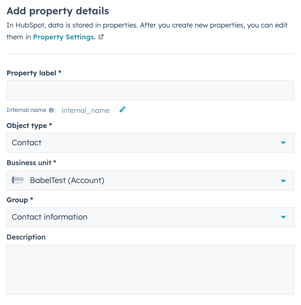
Create a Custom Contact Property
First, you'll need a custom property to store the link for the download. Here's how:
- In HubSpot, navigate to Contacts > Properties.
- Click Create property.
- Name your property appropriately (e.g., "Recent Download URL").
- Set the Object type to "Contact" and choose the appropriate Group.
- Set the Field type to "Single line text."
- Leave the validation rules as they are.
- Ensure the data is marked as non-sensitive.
- Review the edit access settings.
- Preview your property, then click Create to make it live.
Configure Your Forms
Now that your URL property is created, you need to add it to your forms. This will populate the form automatically for you.
- Edit or create the form you want to use.
- Add the custom property you just created to the form.
- Make the property hidden so it's not visible to form submitters.
- In the property's default value field, paste the link to the relevant download. So for example, if someone is downloading our Portal Audit Playbook then we'd paste the file link in the property field when building the form.

Create Your CTA
Now for the exciting part: creating your personalised CTA that will show up on your website and link the contact through to their recent conversion. This can be text or an image—the choice is yours. But you have to create the CTA as an image rather than building it in the CTA module.
- Create your CTA image and upload it into HubSpot files.
- Add your CTA or text CTA to the desired page on your website.
- Insert the personalised token where you want the dynamic link to appear (as shown in the image below)."

From here, it gets slightly more technical, you're going to want to edit the source code.

Once you are in your source code, you're going to edit the "href=" from the dummy URL to the contact token, like you can see in the image above.
Update Existing Contacts
You've set up your personalised CTA for future submissions, but what about your existing contacts? Here's how to update their properties:
- Create a new workflow in HubSpot.
- Enroll the contacts you want to update via a list (e.g., your "Marketing Contacts" list).
- Use an If/Then branch to segment your contacts based on their recent downloads. For example, you'll create branches for different download categories.
- Within each branch, add an "Edit Record" step.
- In the "Edit Record" step, set the value of your custom property (e.g., "Recent Download URL") to the appropriate download URL for that branch. See the image below for a visual example

Test, Test, Test
Now that you've created everything, updated your old properties, and created a way for them to populate in the future, you'll want to test your custom CTA and make sure its working depending on which contacts are viewing.
This hack has many other use cases if you put your mind to it and can be a useful smart way to reduce smart modules/CTA's and many lists and workflows.