Manual task tracking often leads to oversight, delays, and missed opportunities, causing unnecessary challenges for teams. And when it comes to running a multi-channel ABM campaign, you need to make sure things run as smoothly as possible so your communications hit the contact all at the right time.
Unfortunately, at the time of writing, you can't trigger activity based on contact related tasks - it has to be tasks related to deals. That's why we created this hack to help you use this functionality and automate your ABM approach.
Step 1: Create new ABM pipeline
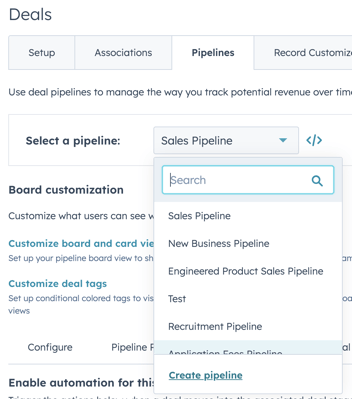
- Click "Sales" > "Deals" > Click "Sales Pipeline"
- Click "edit pipelines" or "Add pipeline automation" (they take you to the same place)
- Click "Create pipeline" (see image)
- Add a name
- Customise the steps appropriate for your campaign or usage
Step 2: Bulk create deals
- Go to "Automation" and then "Workflows"
- Trigger based on appropriate list membership
- Add an action by clicking on the "+" icon
- Click "CRM" > "Create record" > "Deal"
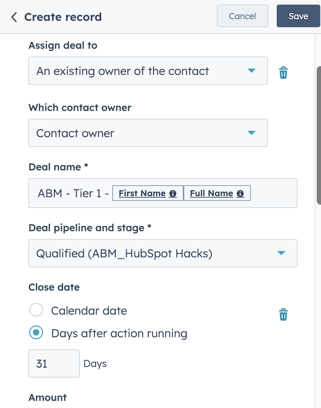
- Fill out your record to reflect your campaign, here is an example for this ABM campaign. We want to target the contact owner, and we want the deal name to be easily searchable later so we have included "ABM" and the contact personalisation tokens
- Set the deal pipeline and stage and make sure to add automation for the close date
- Add another action in the form of a task to remind the contact owners of next steps. For us, this was to send out some post.
Step 3. Create automatic reminder
- Go to "Automation" and then "Workflows"
- Select "Create workflow" > And then select "Deal-based"

- Set the trigger to be associated to any activity
- Add more triggers to narrow down the criteria based on the task title. For this example it would need to contain "ABM - Postal"
- And then specify that this task status is not completed. It should look like this:
- Add an action by clicking on the "+" icon
- Select "Communications" > "Send internal email"
- Build out the internal email with appropriate text. For this example we want to remind the contact owner to send out the postal mail and complete the task
- You can then repeat these actions daily until the task is complete.
Step 3. Create automatic sequence enrolment
- Go to "Automation" and then "Workflows"
- Select "Create workflow" > And then select "Deal-based"
- Set the trigger to be associated to any activity
- Add more triggers to narrow down the criteria based on the task title. For this example it would need to contain "ABM - Postal"
- And then specify that this task status is complete
- We then added in a delay for a few days to allow the post to arrive
- And then add another action by clicking on the "+" icon
- Click "Communications" > "Enrol in sequences" > Click "Sequences" > "Contact owner"
After setting this process live, replicate it effortlessly for various stages within your pipeline!
Hopefully the newly created ABM pipeline provides a structured framework for your campaign, and the bulk creation of deals will definitely streamline the initial setup. Add in the automatic reminders and sequence enrolment to improve efficiency and make sure no crucial steps are overlooked. This hack empowers your team to focus on the strategic aspects of your ABM campaign, leaving repetitive tasks to the automation workflows.
