When a valued member of your Sales or Account Management team moves on, ensuring a smooth transition in HubSpot is crucial. You don't want vital client relationships or ongoing deals to fall through the cracks! Fortunately, you don't need complex tools to manage this effectively. Our method, utilising HubSpot's free static lists, is quick, tidy and keeps your CRM pristine.
Why This Matters: The Power of Static Lists
- A Precise Snapshot: Instantly see everything the departing team member owned – Contacts, Companies, Deals, Tickets, and more – at the moment they left.
- Effortless Reassignment: Simplify the handover process, whether you're bulk unassigning records or reassigning them to new owners.
- Clear Audit Trail: Maintain a comprehensive record of ownership before deactivating the user, ensuring full accountability.
- Prevent Gaps: Avoid dropped balls on critical customer interactions, unaddressed tickets, or stalled deals.
Here's your step-by-step guide to a smooth handover:
Let's walk through how to create these essential static lists. For this example, we'll focus on Contacts, but the process is identical for Companies, Deals, Tickets, or any other object you need to track.
Step 1: Create Your List
Navigate to CRM > Lists. In the top right corner, click the 'Create list' button.
Step 2: Choose Your Object
You'll be prompted to select the object you want to track. Choose 'Contacts' (or Companies, Deals, Tickets, etc. – whatever you need a snapshot of from the departing team member).

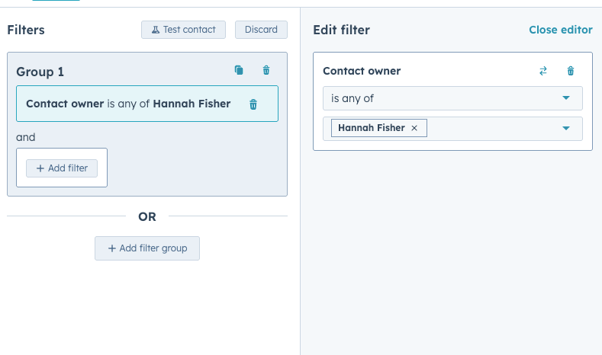
Step 3: Define your filters
Set your filter to:
- 'Contact owner is' (or 'Company owner is', 'Deal owner is', etc.)
- Select the name(s) of the person or people who have left your company.
Step 4 : Save as a Static List
Crucially, when you've reviewed your list, click 'Save' and ensure you select 'Static list'.
Why Static? This is key! A static list captures a fixed moment in time. Even after you reassign ownership, this list will retain the original records, providing an invaluable audit trail of what the leaver owned before any changes were made.
Step 5: Reassign Ownership
Now that your static list is created, you can easily reassign the owned objects:
- From within your newly created list, select the contacts (or companies/deals) you wish to reassign. You can do this by clicking the checkbox on the left-hand side.
- Click the 'Assign' button (or 'Edit' then 'Assign' depending on the object type).
- Choose the new owner(s) from your active team.

Pro-Tip: Communicate the Change!
Once reassignments are complete, consider letting the new owners know what they've taken on. A quick internal heads-up can go a long way in ensuring a seamless customer experience.
By following these simple steps, you'll maintain a clean, auditable CRM, prevent crucial information from slipping through the cracks, and ensure your customer relationships continue uninterrupted. Simple, easy, and effective!