We all know you can add personalisation tokens to marketing emails but how can you take it one step further? Imagine receiving a marketing email with an offer, and the main CTA was to book a meeting with your personal account manager to discuss it further. You can choose a time that suits you, you don't need to email anyone and all it takes is one click.
By adding a contact owner's meeting link, you can bulk-send marketing emails without having to create a new email per contact owner.
Essentially you'll need to create a custom contact property and a workflow to ensure the correct meeting link is being assigned to each contact.
Step 1: Connect your email
Whether you're using Gmail or Outlook, HubSpot will integrate easily and quickly. To do this click the settings icon in the main navigation bar.
Navigate to General and then the emails tab. Click connect personal email and follow the instructions.Step 2: Create your meeting link
If you haven't already, navigate to Sales > Meetings. In the upper right, click Create scheduling page. In the dialog box, select the meeting option: "One-on-One".
Follow the steps by adding appropriate information regarding the page title, team members and description. Once live, make a note of the scheduling page URL as you'll need this later.
Step 3: Create a custom contact property
Now that you have got your email connected, that should automatically sync your calendar too. So the next step is creating a custom property to house your meeting link.
In your HubSpot account, click the settings icon in the navigation bar. Navigate to Properties and click the "contact tab." Next, in the upper right, click "Create a property". Make sure you select a Single-line text field type and save.
We recommend calling this property "Contact Owner Meeting Link" or something similar.
Step 3: Create a workflow to automate property
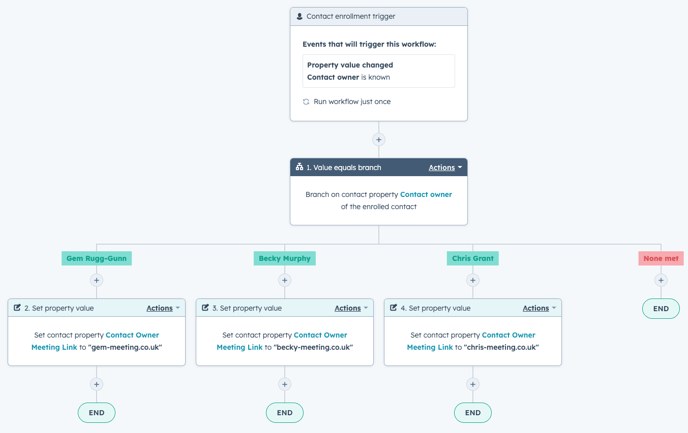
Next, you'll need to create a workflow in order to set the "Contact Owner Meeting Link" property to the relevant contacts. To do this, navigate to Automation > Workflows and create a contact-based workflow.
Set the enrollment trigger to be if the contact owner is known. Then add a values equal branch which should then create a seperate branch for each user. Next you'll want to click the + icon underneath a branch and select the "set contact property value " action. Search for "Contact Owner Meeting Link" and paste the scheduling page URL from step 2. Do this for each user and it should look something like the below.
Step 4: Use it in emails
Now you can insert this "Contact Owner Meeting Link" in just the same way that you would for a "First name" personalisation token.

Author: Bridget Reid
Principal Marketer
