Best practice in CRM design recommends keeping pipeline stages clear, concise, and meaningful - each stage should represent a distinct phase in your process with a well-defined exit point. Overloading pipelines with too many micro-stages can make reporting harder to interpret, increase user confusion, and slow down deal movement.
But what if a single stage contains several smaller steps that don’t follow a strict sequence or don’t need individual conversion reporting?
In these cases, colour-coded deal tags offer a clean and user-friendly way to track sub-stages (or "mini-milestones") without cluttering your pipeline. You can surface progress visually - right on the deal card - by using red tags for incomplete tasks and green tags for completed ones. Once all required tasks are marked complete, automation can move the deal forward.
This approach benefits both:
- Reps, who get a quick visual cue of what’s left to do, without jumping between records
- Managers, who can monitor progress at scale and ensure no deal is stuck waiting on an unseen task
It's a scalable, intuitive solution for tracking granular progress while preserving pipeline clarity!

In the above example, we’re managing student onboarding within an "Accepted" pipeline stage. Each student needs to complete four onboarding steps:
- Make payment
- Register
- Complete the Integrity Test
- Complete the Induction Course
All four steps are tracked with deal tags, colour-coded:
- ✅ Green for completed
- 🚫 Red for not completed
Once all four steps are completed, the deal is automatically moved to the "Ready to Study" stage.
But the same approach is transferable to many other use-cases.
Step 1: Set Up an Automation to Create Onboarding Tasks
Use a deal-based workflow to create tasks for each of the sub-stages you'd like to track within a pipeline stage. The workflow trigger will be when the deal enters that stage and the actions will be the creation of each task.
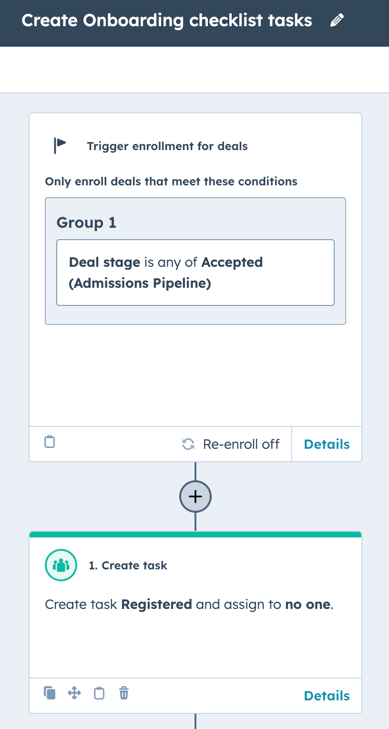
This ensures naming consistency, which is key to the deal tags working accurately.
Step 2: Create Custom Deal Tags
Create pairs of deal tags, two for each sub-stage task - one where the task is marked as complete, and one where it is not.
Ensure that the task names referenced in the deal tags match exactly those that have been used in the task creation actions in the workflow.

Colour-code the tags, using a red background for uncompleted tags and green for completed ones, to make them visually intuitive.

Step 3: Create a "Gatekeeper" Workflow to Move the Deal
Once all sub-stage tasks are complete, use a workflow to move the deal to the next stage.

Why This Works
- Visibility: Everyone can instantly see what’s done and what’s outstanding
- Simplicity: Avoids cluttering your pipeline with unnecessary sub-stages
- Automation-friendly: Enables a clear and consistent path for automation to act on
- Scalable: You can reuse this approach in other pipelines or departments
Need Help Setting This Up?
This process can be set up entirely using HubSpot Pro features, or enhanced further with custom-coded actions if you're using Operations Hub or a private app. If you're not sure where to start, feel free to contact our team!